Sunday, April 6, 2014

Powershell Intro

Was excited to learn that a friend's son is going to a technology camp this summer.  Thought he might like this little bit of powershell code.

The code at the end of this post will ask what you want the computer to say, and then it will speak the text.  Assuming you have a Windows computer, do the following to run the code:

1) Click on the Start button --> and type Run
2) type in     Powershell ISE
3) Copy and paste the code at the bottom of the post into the powershell window (should look similar to the screen shot below)


4) Press F5 (or the icon that looks like a DVD Play button)


Code to copy and paste:
# ------------------------------------------------------
#   ignore this for now
# ------------------------------------------------------
$ErrorActionPreference= 'silentlycontinue'
[Reflection.Assembly]::LoadWithPartialName('System.Speech')
# ------------------------------------------------------
#   clear the screen
# ------------------------------------------------------
cls
# ------------------------------------------------------
#   Ask what you want the computer to say and put that
#   info in the variable $phrase
# ------------------------------------------------------
$phrase = read-host -prompt "What do you what the computer to say?"
# ------------------------------------------------------
#   ignore this for now
# ------------------------------------------------------
$object = New-Object -ComObject SAPI.SpVoice
# ------------------------------------------------------
#   Write the variable $pharse to screen (not needed)
# ------------------------------------------------------
write-host $phrase
# ------------------------------------------------------
#   Have the computer speak what was entered
# ------------------------------------------------------
$object.Speak($phrase)

Friday, January 24, 2014

The quizzer

The script outlined below is essentially a set of electronic flash cards. There are all sorts of websites & programs that offer similar functionality.  That being said, I had a large set of terms I wanted to memorize, and this seemed like a fun way to get a little more Powershell experience.  

Many parts of the script are VERY basic, but there were a few parts (Get-Random and hash tables) that were interesting to explore.  

Here is an overview of the components of the script:

1) Read in a CSV of terms and definitions
2) Randomly pick a Term / Definition to quiz the user on
3) Generate a hash of the correct term (answer) and 4 other false answers
4) Randomize the hash and present to the user
5) Prompt the user to select an answer and evaluate the response

Click here for the full script


Saturday, January 18, 2014

Faster DNS Resolution

Recently a friend shared a link from TechRepublic that suggested changing your DNS servers in order improve web browsing speeds.

This seemed interesting and I initially changed my home DNS servers to 8.8.8.8 and 8.8.4.4.  Afterward, I started to wonder if my Internet provider might be able to route to one DNS server faster than another.  Additionally, it seemed logical to assume that the actual resolution could potentially be done faster on one DNS server farm than another.

It seemed like it would be neat to validate existing performance vs. the suggested DNS servers listed in the TechRepublic article.  The idea would be to highlight if a DNS server change would be beneficial on your home network.

Here is the type of output I ended up with:

10.10.1.1 is an internal DNS server and should not be modified
10.10.1.2 is an internal DNS server and should not be modified

Resolution times by DNS Servers (best to worst)

Name              Value
208.67.222.222    00:00:00.0728325
75.75.75.75*      00:00:00.0740533
208.67.220.220    00:00:00.0813375
8.8.8.8           00:00:00.0988982
8.8.4.4           00:00:00.1096580                                                                                      
* - denotes your existing DNS server

If you would like to test your current DNS settings, you are welcome to try the following powershell script on your system:

$ErrorActionPreference = "SilentlyContinue"
cls
$DNS = Get-WmiObject Win32_NetworkAdapterConfiguration -computername . | select DNSServerSearchOrder
$names = $dns.DNSServerSearchOrder
$techRepublicSuggested = ("208.67.222.222", "208.67.220.220", "8.8.8.8", "8.8.4.4")
$names = $names + $techRepublicSuggested
Foreach ($name in $names)
    {
    if (($name -like "10.*") -or ($name -like "176.*") -or ($name -like "192.168.*"))
        {
        Write-Host "$name is an internal DNS server and should not be modified"
        $names =  $names -replace $name
        }
    }
Write-Host ""
$names = $names | Where { $_.Trim(" `t")}
$hashlatency = @{}
$hashresolve = @{}
Foreach ($name in $names)
    {
    $resTime = Measure-command {resolve-dnsname systemzengineer.blogspot.com -server $name}
    if ($techRepublicSuggested -notcontains $name)
        {$name = $name + "*"}
    $hashresolve.add($name, $resTime)
    }
Write-Host "Resolution times by DNS Servers (best to worst)"
$hashresolve.GetEnumerator() | Sort-Object Value
Write-Host ""
Write-Host "* - denotes your existing DNS server"

Monday, November 11, 2013

Automate that Script

A few lines of Powershell commands is a great start, but setting up a scheduled task is essential to getting the most out of your scripts.

The Task Scheduler has been around so long that this might not even seem worth noting, but there are two steps to help get your script running consistently.

1) When setting up your Action, make sure to select "Start a program".  Next, in the box for "Program/script:" enter the path to where Powershell is located (likely C:\Windows\System32\WindowsPowerShell\v1.0\powershell.exe).  Finally the path \ script should be entered into the "Add arguments..." box.

2) The other key for our setup has been to change the task to run under a service account, and also select "Run whether user is logged on or not".

Thursday, October 24, 2013

The Need for Speed

Selecting the right WAN connection can be something of an art.


Depending on the size of your organization, WAN communication costs can be a huge recurring expense.  Additionally, because WAN links are typically so much smaller than normal LAN connections, there tends to be a desire to get the most bandwidth (biggest "pipe") possible.   Finally, sometimes we have difficulty finding a carrier to offer our desired service for a given address.  The combination of cost, bandwidth, and availability are key factors that go into our final selection of a WAN circuit.  


When selecting a WAN circuit, a critical element that is often overlooked is latency.  Latency is the concept of how long did the task take to complete.  


The example above is from a cable modem connection.  Although the connection averages 17 Mbps download, and 5 Mbps upload, the latency is almost 10 times worse than a normal T1 / MPLS connection.  When you add the overhead of VPN to the connection, the latency can easily push up to a 90ms average.

We recently converted some WAN sites from cable modem / VPN to MPLS.  The following chart illustrates the latency times before and after the conversion.


Some computing tasks are more time sensitive than others.  If your environment is attempting to push time sensitive traffic like VOIP or virtual desktops across a WAN link, you need to pay very close attention to latency.  


Monday, October 21, 2013

Visualize the Flow

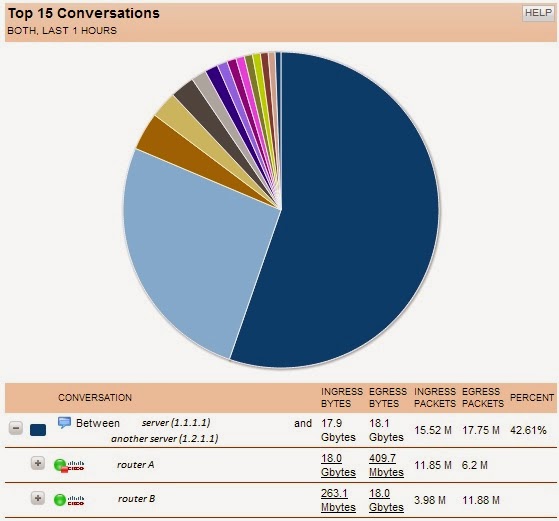
Understanding what is flowing across the network is essential.  Products like Solarwinds Netflow Traffic Analyzer help provide a view into what is (and has been) happening on the network.

With Netflow Data: IT teams can quickly zero in on what is currently impacting performance.  

Without Netflow Data:  IT teams often scramble through ineffective actions like rebooting various devices. Sometimes by  guessing through the problem, IT teams can actually create additional issues.


Fortunately, gathering this information is fairly easy.  First you need to get the SolarWinds NTA product setup on one of your servers.  Afterward, the NTA site should show what port the service is listing on.  This "collection port" information is used later when setting up the devices that your want to collect NetFlow data on.


The next step is start to add points on the network that you want to monitor.  For example, if a remote T1 connected site is having recurring difficulties with WAN performance, it would be great to know what specific types of traffic is moving across the T1 connection.

Adding the device to NTA is fairly easy.  If you wanted to collect T1 connection information from the Cisco router in the example above, you simply add a few configuration lines to the router where the T1 is connected.  There are two simple parts to the addition:

  • Add the following to the base configuration of the router you want to monitor:

ip flow-export version 9
ip flow-export destination 2.2.2.2 2055     

(2.2.2.2 should be replaced with the IP address of your SolarWinds server and 2055 is the collection port of your NetFlow collector service on that server)

  • Add the following to the specific interface that you want to monitor (ex: Serial 0/0/0):
ip flow ingress
ip flow egress

There is a lot of information available on the Solarwinds NTA product, but the key point here is that setting up your devices to report this type of NetFlow data is very easy.


Friday, October 4, 2013

Rediscovering Good Ideas

Recently a teammate came up with a great idea: Create a way to quickly search the content of our Powershell script library.   Wouldn't it be great to know "which scripts reference specific servers?"   What if we had a way to determine "what scripts use the following command?" 

Although the script is fairly basic, the yield can be very powerful!


Easy to understand search

Matches displayed in a hash table


Selected script displayed in a temporary text file to avoid accidental overwrites. 

Here are the basics of the script:
    1) set the path to the library that will be searched